Install FortiClient VPN with Intune – Part 1

Table of Contents

Introduction

If you are already using FortiClient in your organisation you would likely know that it comes in both paid (with support) and unpaid (without support) options. The paid option includes things like antivirus, vulnerability scanning, and ZTNA capabilities to name just a few, and is typically managed by FortiClient EMS (Enterprise Management Server) to centrally configure, manage and distribute security policies, the FortiClient software itself and VPN profiles.

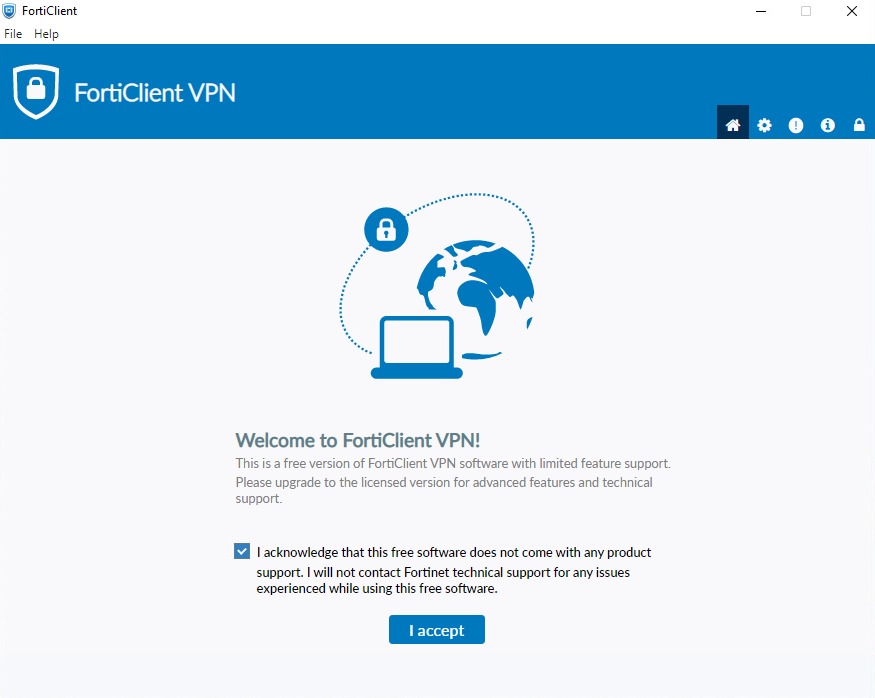
However, if you have alternate endpoint security mechanisms in place, the free FortiClient VPN would be enough for you to connect back to your corporate VPN. Unless you have implemented Windows Group Policy Objects or have some kind of automation tool, chances are that the client software is out of date, and open to security vulnerabilities.

As a small business starting out and trying to keep costs down, I need to be doing more with less – which is not unfamiliar for any organisation, especially so for IT departments. Therefore, as part of my Microsoft 365 Business Premium package I am entitled to use Microsoft Intune. Therefore, what better way to start the Intune journey than to put it to practice!

In this three-part series we will show you:

While Parts 1 and 3 discuss installation and upgrade of software packages using FortiClient VPN, this knowledge is transferrable to many other applications and is not specific to FortiClient VPN.

Getting Started

In order to deploy this, you will need to satisfy the following prerequisites:

  1. Access to Azure AD – https://portal.azure.com and enough rights to make changes (outside the scope of this article)
  2. Licenses for Microsoft Intune – to learn more see https://learn.microsoft.com/en-us/mem/intune/fundamentals/licenses
  3. Access to https://endpoint.microsoft.com/
  4. Access to download FortiClient VPN – https://www.fortinet.com/support/product-downloads#vpn
  5. A Windows 10/11 laptop or virtual machine:
    • With local admin rights
    • That is Azure AD Joined, Azure AD Registered, or Hybrid Azure AD Joined
Let’s get started!
 
Note: click on any of the images to open them in a new window. Some of them are hard to read on the page.
 

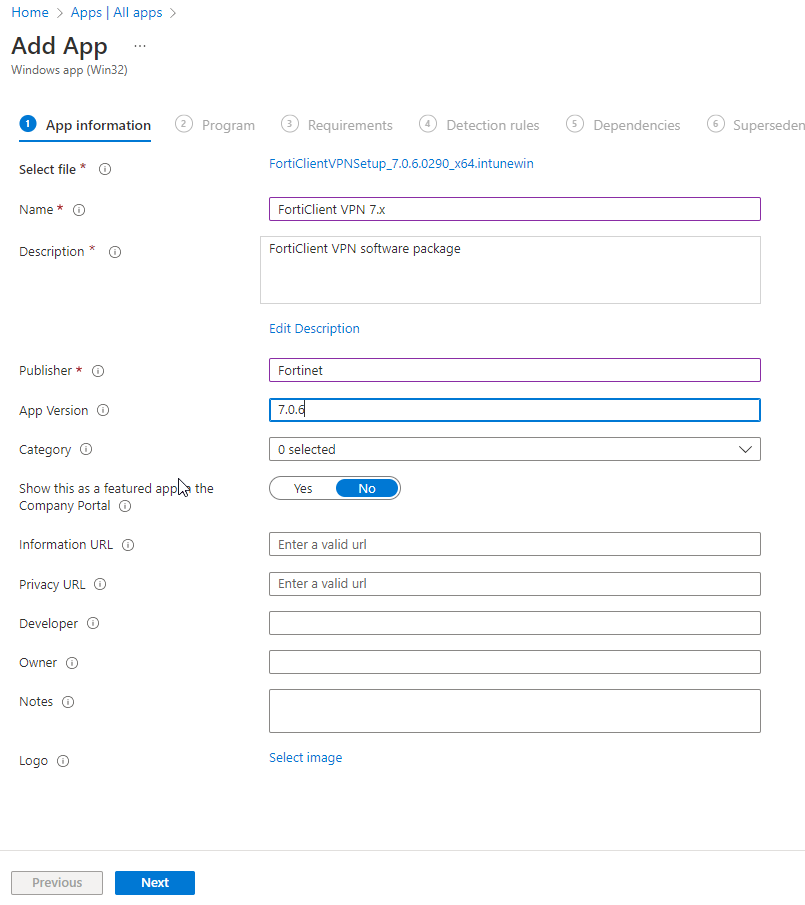
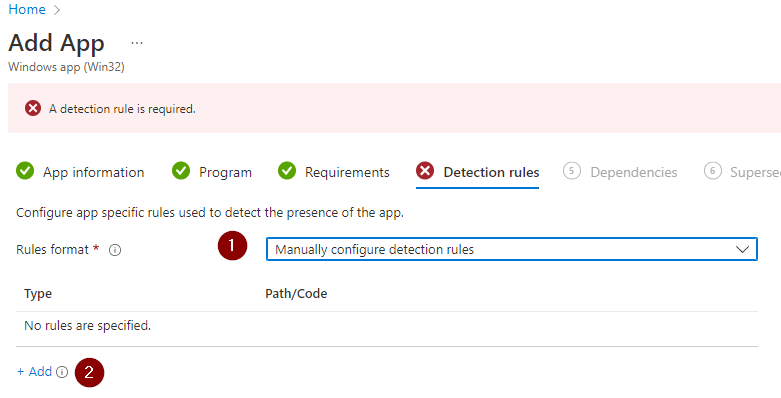
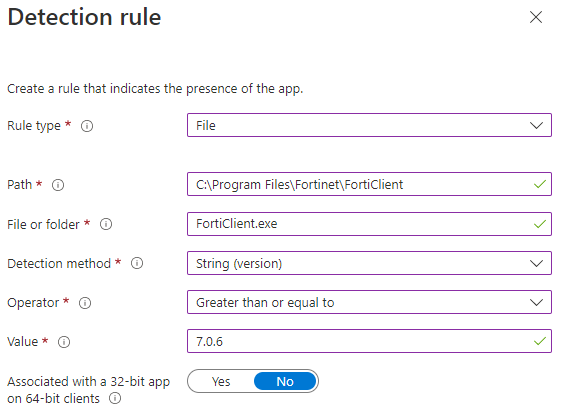
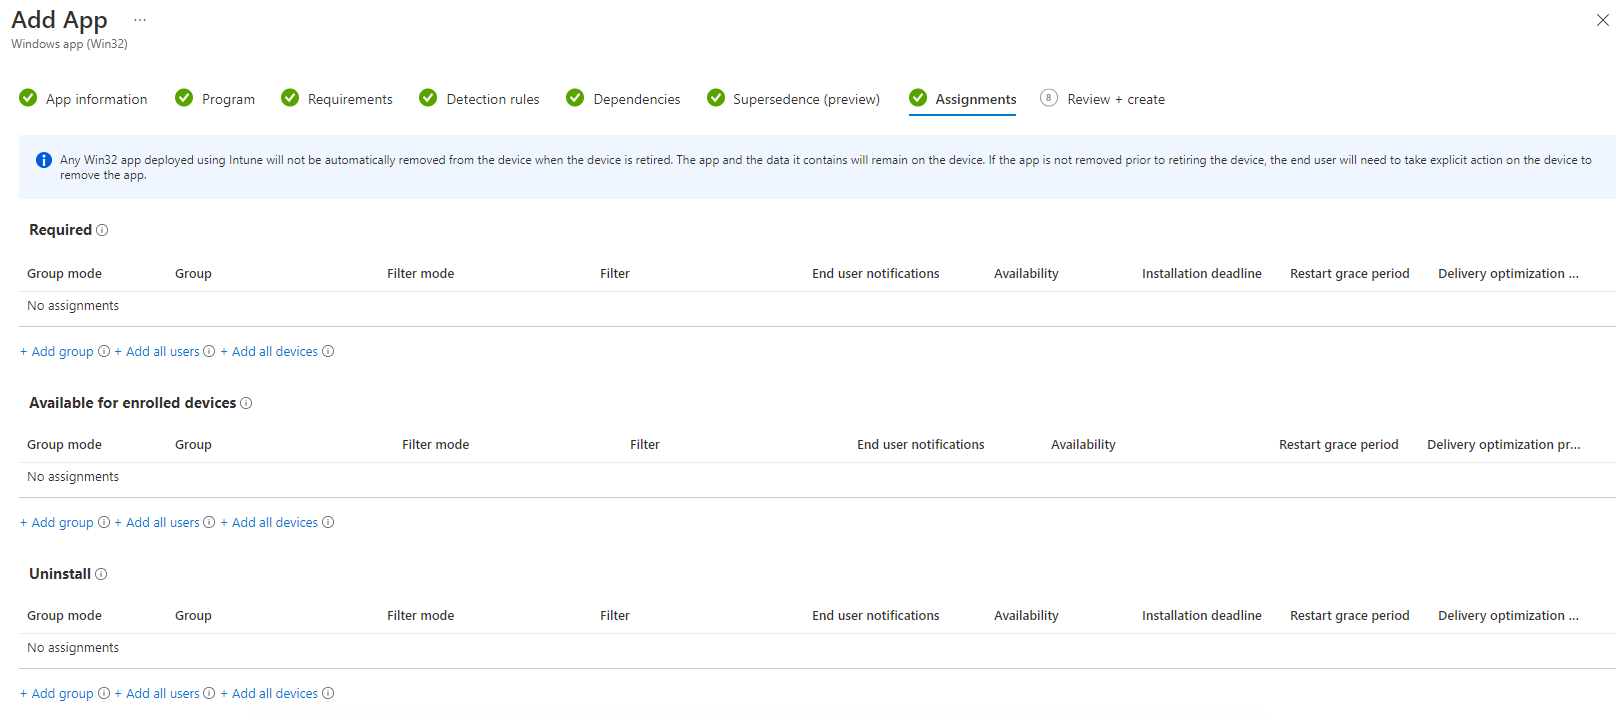
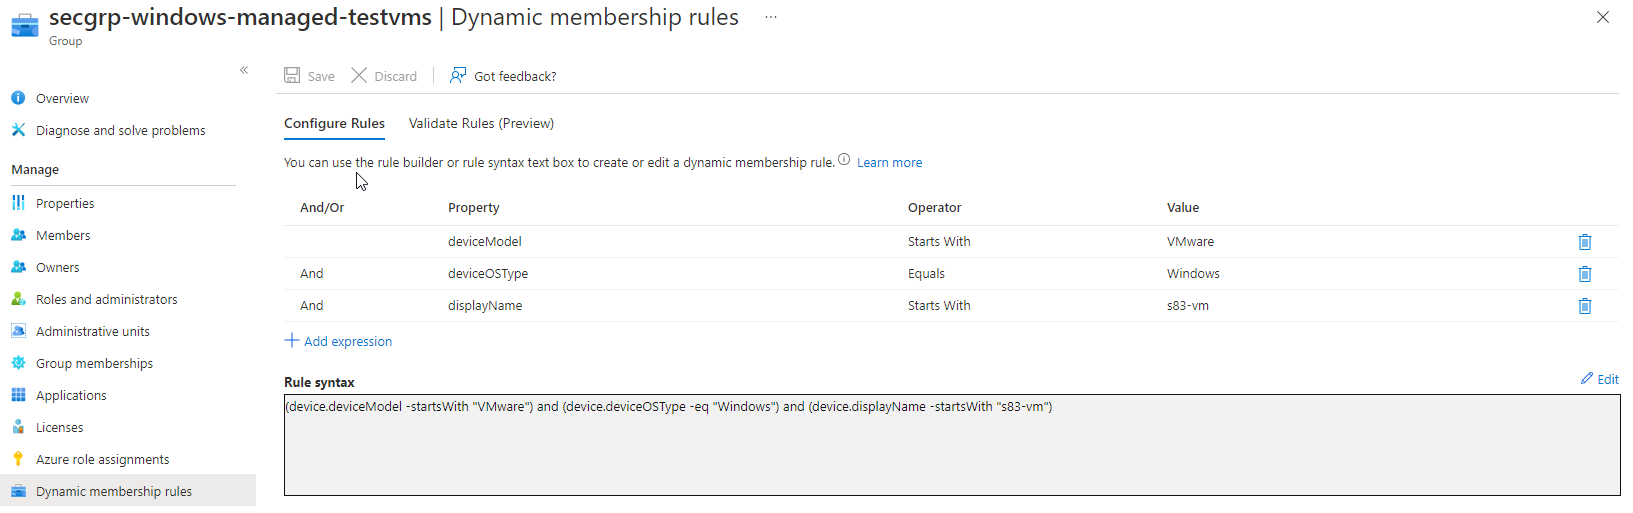
FortiClient VPN Packaging

Considering that in Part 3 of this series we are going to focus on upgrading FortiClient VPN, we will download two separate versions. In my case I have downloaded the two latest versions:

  • FortiClientVPNSetup_7.0.6.0290_x64.exe
  • FortiClientVPNSetup_7.0.7.0345_x64.exe – for use in Part 3
In order to upload this executable to Intune, it needs to be packaged into the IntuneWin format. More about that process here: https://learn.microsoft.com/en-gb/mem/intune/apps/apps-win32-app-management.
 
To simplify, we are going to download and use the ‘Microsoft Win32 Content Prep Tool’, downloadable here: https://github.com/Microsoft/Microsoft-Win32-Content-Prep-Tool
 
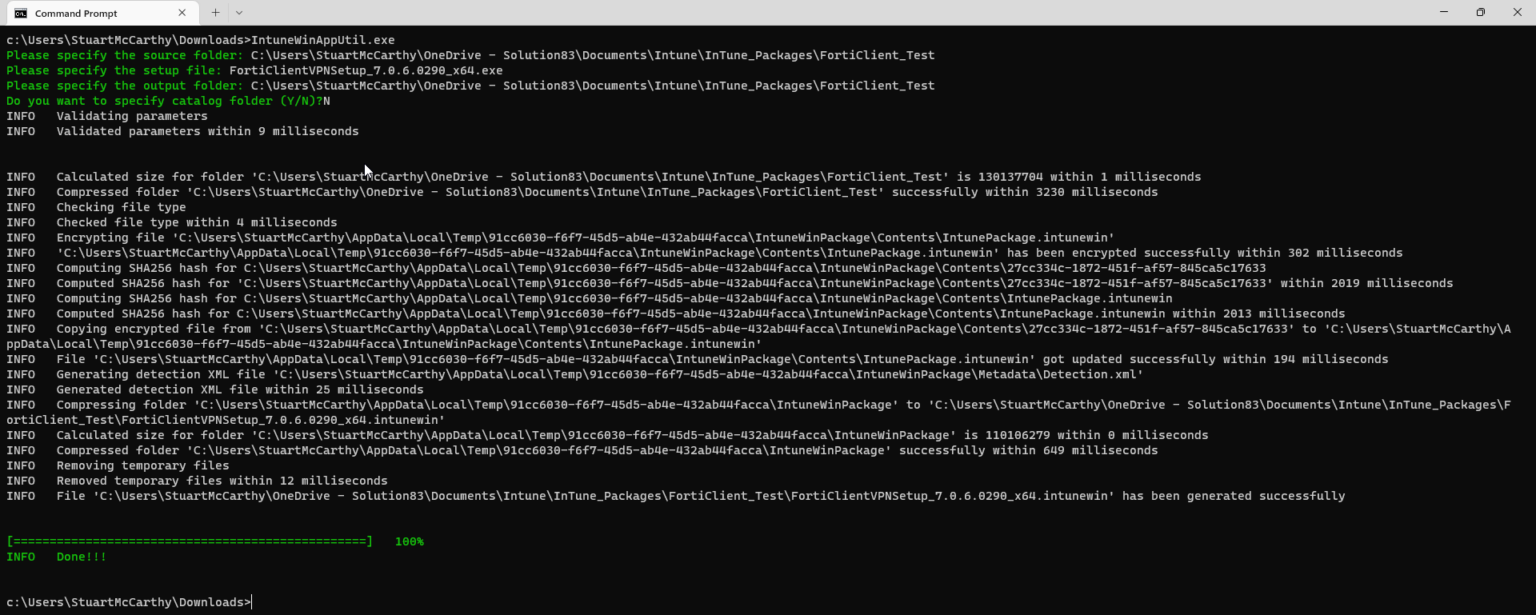
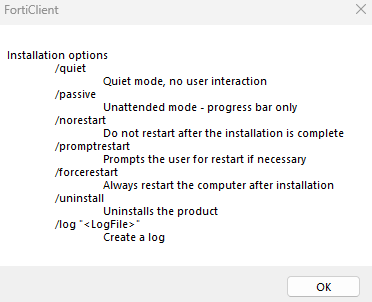
Once you have downloaded the tool, you can either execute it directly or open from command prompt, where it will ask for the following:
  1. Source Folder – the location of the setup file
  2. Setup File – the name of the setup file
  3. Output Folder – the location of where to store the created file
  4. Catalog Folder – this to the best of my knowledge is deprecated and ‘N’ can be selected
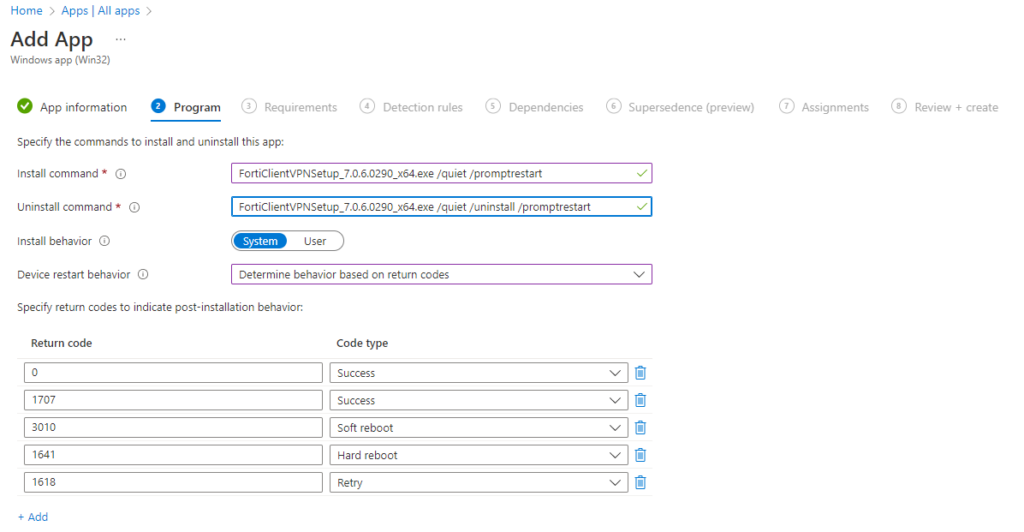
Once all details are provided and executed, you should see an output similar to below, which on completion should create a file with the .intunewin extension in the output folder:

Update: Make sure that the folder only contains the single package (.exe) that you want included in the *.intunewin file. If you don’t, you will find that the file size will be much larger than required as it packages all files in the folder. One option is to have a structure like:

  1. C:\temp\input\ which has forticlient.exe
  2. C:\temp\output\ which will be the destination for forticlient.intunewin

See Prepare a Win32 app to be uploaded to Microsoft Intune | Microsoft Learn for more information.

Intune Configuration

Once the executable is packaged it is time to configure Intune to deploy the package to endpoints. To start this process open the Microsoft EndPoint Admin Center at https://endpoint.microsoft.com.

Within the Endpoint Manager Admin Center:

  1. Select ‘Apps’
  2. Select ‘All Apps’
  3. Select ‘Add’

To upload the IntuneWin file previously created, select the ‘Windows app (Win32)’ option

  1. Select the IntuneWin file which was created earlier and click ‘Ok’
  2. Fill out as many of the details as you like, ensuring that all mandatory fields are completed
  3. Click ‘Next’ to continue
As part of this exercise, you will notice that I have configured the version as 7.0.6. In Part 3, we will change this to 7.0.7 and upload the new package.
 

One of the most important steps is to configure the installation commands for the application. As you will push the application to endpoints in an automated fashion, making sure the app installs without interaction is key. 

To understand what application flags are available, open a command prompt and execute the installer with ‘/?’ or ‘/help’. For example:

FortiClientVPNSetup_7.0.6.0290_x64.exe /?

Once we know the installation flags, we can include these for the install and uninstall commands:

Install: FortiClientVPNSetup_7.0.6.0290_x64.exe /quiet /promptrestart

Uninstall: FortiClientVPNSetup_7.0.6.0290_x64.exe /quiet /uninstall /promptrestart

Here you can specify the architecture, 32 or 64-bit, as well as the minimum operating system version / build. 

These days the OS architecture should all be 64-bit and I do not need to limit the OS / build in my case, so I will select the earliest release available which is Window 10 1607. 

In order for Intune to determine whether or not the application is installed or not, we need some type of detection rule in place. To do this:

  1. Select the option to ‘Manually configure detection rules’
  2. Click ‘Add’
Here we need to specify the details of the rule:
  1. Rule type: a file in this case
  2. Path: the location where the file exists – “C:\Program Files\Fortinet\FortiClient”
  3. File or folder: the file or folder we want to check – “FortiClient.exe”
  4. Detection method: String (version) has been selected
  5. Operator: Greater than or equal to
  6. Value: 7.0.6

Note: if you view the file properties in Windows explorer you can clearly see the file version. You could input the exact value here using the “equals” operator.

Skip both the Dependencies and Supersedence tabs. There are no required dependencies to configure and supersedence we will cover in Part 3.

Intune policies at this point are prioritised as:

  1. Required: a mandated app that will be installed automatically
  2. Available for enrolled devices: a published app that can be optionally installed by the user
  3. Uninstall: likely only to be used when the app is no longer required, has some kind of issue, or you want to perform some testing. 

To accompany this, there are three ways to assign the policies:

  1. All users
  2. All devices
  3. Groups – either a user or device group

In order to target particular users or devices, a group probably makes the most sense here, especially during testing.

As I wanted to install to a single machine, I created a dynamic group which allows for assigning devices to the group based on key criteria. 

As I am using a test VM running on VMware, I used the following dynamic rule:

  1. Device Model – Starts With – VMware
  2. DeviceOSType – Equals – Windows
  3. DisplayName – Begins With – s83-vm
This will apply the rule to a managed VM called s83-vm01 which I am using to test with. You can optionally use the ‘Validate Rules’ tab to ensure that the rule will apply to the machines you expect them to.

Once you have validated that the correct machine will be selected, accept the remaining defaults to ensure that the app creation is completed.

Confirming The Installation

Now that we have successfully configured the app and assigned it to the required users or devices, let’s take a look at how to confirm that the application has been installed.

Start by selecting the device:

  1. Devices
  2. Windows Devices
  3. Select the device – in this case s83-vm01


Review ‘Managed Apps’ checking:

  1. The application is listed. This confirms if the dynamic group is working correctly or not
  2. Check ‘Installation Status’

As you can see in this example, FortiClient VPN 7.x is successfully installed.

Of course, if you have login access to the device you could also check the device itself to ensure that the application is installed. This can be done from ‘Add or Remove Programs’. In this case you can also see the software version.

When opening FortiClient VPN for the first time, you will be greeted with a welcome message – which you can see below. Be sure to review this message and acknowledge the disclaimer for use.

Note: I am sure there is probably a way to automatically accept the warning via a registry key, however, I have not found a simple solution for it, especially as the registry entry is version dependent. It is stored under HKLU:\Software\Fortinet\FortiClient\FA_UI. It is located in a folder, with a regkey called ‘installed’.

Also, keep in mind that if you follow my next post where we script the VPN values, you won’t see the VPN profiles until the warning has been accepted – something which tripped me up for quite a while on a fresh install. While it would be ideal to avoid this, for the time being I would simply add the warning acceptance to any user instructions provided, advising them to accept it if displayed.

Once the disclaimer has been accepted, FortiClient VPN will redirect you to a page to configure a VPN like below. Of course, you can configure profiles manually and if that’s ok for you (or you just want to test it out) go right ahead and add one. Alternatively, please check back for Part 2 of this series where we will push a config via Intune.

Closing Statement

This ends Part 1 in the series. Please keep an eye out for the following posts in coming weeks where we will build upon what we have already deployed.

If you liked this article, please feel free to share it:

Facebook
Twitter
LinkedIn

Leave a Comment

Your email address will not be published. Required fields are marked *