Recap
In Part 1 we stepped through the process of installing FortiClient VPN with Microsoft Intune. In this instalment, we will step you through the process of:
- Creating and testing a PowerShell script
- Using that script to deploy both a basic VPN profile and a SAML profile
- Using Microsoft Intune to execute the script for laptops – in particular for new starters
Getting Started
At this point you should have:
- A Windows 10/11 laptop or VM deployed
- The laptop or VM is connected and available via Microsoft Intune
- FortiClient VPN installed with no other VPN profiles – see note below
Note: this is not a hard requirement, as this will work even if you do have other VPN profiles installed, but please ensure you know how to backup and restore the Windows registry or are at least familiar with modification of the registry before taking this on. We take no responsibility for any damages caused.
Security Caveats
When using PowerShell scripts on servers and endpoints (in particular), it is important to ensure that security remains front of mind, as PowerShell scripts are often used as a method to deliver unwanted applications / behaviours onto a device. Before implementing any scripts into an environment, it is recommended at a minimum to:
- Consult with your IT security team (if you have one) or IT Manager
- Follow best practices for the securing of PowerShell scripts – in particular settings for the PowerShell ExecutionPolicy
- Introducing script signing, in combination with the ExecutionPolicy
Note: for the purposes of simplicity and to prove this solution works in it’s simplest form, recommended security methods have been ignored. Following best practices, you should perform these activities in a test environment before deploying into your production environment and we take no responsibility for instances where you have made an endpoint vulnerable to attack.
Script Creation
The following script is a template that can be used for creating both a basic SSL VPN connection and a SAML based SSL VPN connection. If you are not familiar with SAML, it stands for Security Assertion Markup Language and is used by many applications and identity providers today as a means of standardising authentication – commonly referred to as Single Sign-on (SSO). Some external identity providers that support SAML include Fortinet’s own FortiAuthenticator, Microsoft Azure AD and Okta to name a few, but there are many others.
Depending on your security requirements and firewall configuration you could have both types of VPN profile active at the same time, especially for testing. To configure the script:
- Open PowerShell ISE
- Copy and paste the contents of the sample script – editing as required
- Save the script somewhere with the .ps1 extension
# Set PowerShell Execution Policy - depending on your Powershell settings, this may be required when testing the script
Set-ExecutionPolicy Bypass -Scope Process -Force
# Install Basic VPN Profile #
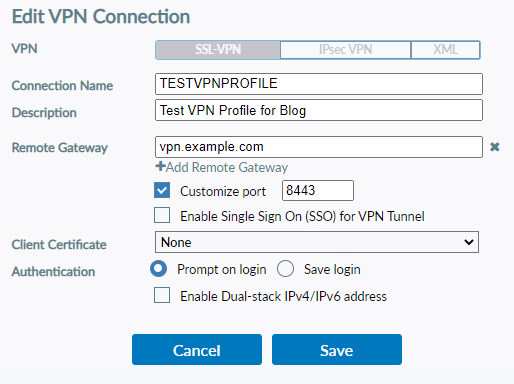
if((Test-Path -LiteralPath "HKLM:\SOFTWARE\Fortinet\FortiClient\Sslvpn\Tunnels\TESTVPNPROFILE") -ne $true) { New-Item "HKLM:\SOFTWARE\Fortinet\FortiClient\Sslvpn\Tunnels\TESTVPNPROFILE" -force -ea SilentlyContinue };
Set-ItemProperty -LiteralPath 'HKLM:\SOFTWARE\Fortinet\FortiClient\Sslvpn\Tunnels\TESTVPNPROFILE' -Name 'Description' -Value 'Test VPN Profile for Blog' -Force -ea SilentlyContinue;
Set-ItemProperty -LiteralPath 'HKLM:\SOFTWARE\Fortinet\FortiClient\Sslvpn\Tunnels\TESTVPNPROFILE' -Name 'Server' -Value 'vpn.example.com:8443' -Type String -Force -ea SilentlyContinue;
Set-ItemProperty -LiteralPath 'HKLM:\SOFTWARE\Fortinet\FortiClient\Sslvpn\Tunnels\TESTVPNPROFILE' -Name 'ServerCert' -Value '0' -Type String -Force -ea SilentlyContinue;
Set-ItemProperty -LiteralPath 'HKLM:\SOFTWARE\Fortinet\FortiClient\Sslvpn\Tunnels\TESTVPNPROFILE' -Name 'promptusername' -Value '1' -Type DWord -Force -ea SilentlyContinue;
Set-ItemProperty -LiteralPath 'HKLM:\SOFTWARE\Fortinet\FortiClient\Sslvpn\Tunnels\TESTVPNPROFILE' -Name 'promptcertificate' -Value '0' -Type DWord -Force -ea SilentlyContinue;
# Install SAML VPN Profile #
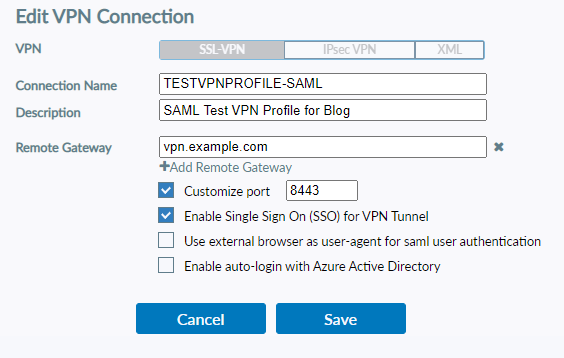
if((Test-Path -LiteralPath "HKLM:\SOFTWARE\Fortinet\FortiClient\Sslvpn\Tunnels\TESTVPNPROFILE-SAML") -ne $true) { New-Item "HKLM:\SOFTWARE\Fortinet\FortiClient\Sslvpn\Tunnels\TESTVPNPROFILE-SAML" -force -ea SilentlyContinue };
Set-ItemProperty -LiteralPath 'HKLM:\SOFTWARE\Fortinet\FortiClient\Sslvpn\Tunnels\TESTVPNPROFILE-SAML' -Name 'Description' -Value 'SAML Test VPN Profile for Blog' -Type String -Force -ea SilentlyContinue;
Set-ItemProperty -LiteralPath 'HKLM:\SOFTWARE\Fortinet\FortiClient\Sslvpn\Tunnels\TESTVPNPROFILE-SAML' -Name 'Server' -Value 'vpn.example.com:8443' -Type String -Force -ea SilentlyContinue;
Set-ItemProperty -LiteralPath 'HKLM:\SOFTWARE\Fortinet\FortiClient\Sslvpn\Tunnels\TESTVPNPROFILE-SAML' -Name 'ServerCert' -Value '1' -Type String -Force -ea SilentlyContinue;
Set-ItemProperty -LiteralPath 'HKLM:\SOFTWARE\Fortinet\FortiClient\Sslvpn\Tunnels\TESTVPNPROFILE-SAML' -Name 'promptusername' -Value '0' -Type DWord -Force -ea SilentlyContinue;
Set-ItemProperty -LiteralPath 'HKLM:\SOFTWARE\Fortinet\FortiClient\Sslvpn\Tunnels\TESTVPNPROFILE-SAML' -Name 'promptcertificate' -Value '0' -Type DWord -Force -ea SilentlyContinue;
Set-ItemProperty -LiteralPath 'HKLM:\SOFTWARE\Fortinet\FortiClient\Sslvpn\Tunnels\TESTVPNPROFILE-SAML' -Name 'sso_enabled' -Value '1' -Type DWord -Force -ea SilentlyContinue;
Set-ItemProperty -LiteralPath 'HKLM:\SOFTWARE\Fortinet\FortiClient\Sslvpn\Tunnels\TESTVPNPROFILE-SAML' -Name 'use_external_browser' -Value '0' -Type DWord -Force -ea SilentlyContinue;
Set-ItemProperty -LiteralPath 'HKLM:\SOFTWARE\Fortinet\FortiClient\Sslvpn\Tunnels\TESTVPNPROFILE-SAML' -Name 'azure_auto_login' -Value '0' -Type DWord -Force -ea SilentlyContinue;
Script Execution Explained
- Line 2 allows the script to run bypassing the PowerShell Execution-Policy parameter, but only for this session – more on this later. After testing these should be removed or hashed out
- Lines 5-10 installs the values for the basic VPN profile
- Lines 13-21 installs the values for the SAML based VPN profile
Of course, you could enable some logging if you want to. I decided not to as when run from Intune, there is a log file you can check which I will touch on later. Intune also provides options for capturing PowerShell execution for auditing purposes, and on endpoints in particular this might be a better method, so I will deal with that later.
VPN Registry Items
- Description: plain text description of what the VPN does or is
- Server: the IP address or public hostname of the firewall to connect to. When using a port other than 443, specify as host:port i.e. vpn.example.com:8443
- ServerCert: whether to verify if the server certificate is valid or not
- promptusername: whether to store the username
- promptcertificate: whether the client should present a certificate or not
- sso_enabled: whether to enable SAML based auth or not
- use_external_browser: advanced setting to simplify the login process. Requires FortiClient 7.0.1 or higher. For more details see: https://docs.fortinet.com/document/fortigate/7.0.1/administration-guide/364443/using-a-browser-as-an-external-user-agent-for-saml-authentication-in-an-ssl-vpn-connection
- azure_auto_login: advanced setting to automatically connect and authenticate to Azure AD SAML with a stored credential. Requires FortiOS 7.2.1 or higher. For more details see: https://docs.fortinet.com/document/forticlient/7.0.7/ems-administration-guide/244292/autoconnect-on-logging-in-as-an-azure-ad-user
Script Execution Factors
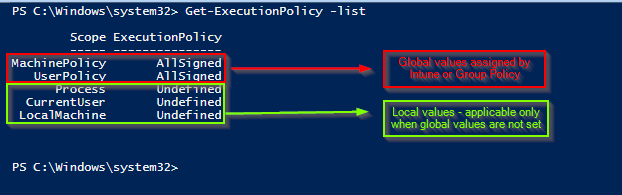
Generally, this script will be run on a Windows desktop as opposed to a server. By default, PowerShell scripts are effectively ‘Undefined’ which on desktop versions of Windows means they are disabled. Therefore, to ensure this will work we need to verify the following:
- Check the PowerShell Execution Policy: Get-ExecutionPolicy -list. This will highlight the settings for PowerShell on this machine. Global values (i.e. GPO or Intune) will override local values. For more information on the available execution policies, check the Microsoft documentation: Set-ExecutionPolicy (Microsoft.PowerShell.Security) – PowerShell | Microsoft Learn
- As you saw the script calls: Set-ExecutionPolicy Bypass -Scope Process -Force. This allows the script to bypass the ExecutionPolicy, but only for as long as this PowerShell session (or window) is active, i.e. the change will not be persistent
- You can change the execution policy with: Set-ExecutionPolicy RemoteSigned -Scope CurrentUser and Set-ExecutionPolicy RemoteSigned -Scope Local Machine. Again, check with your security team if you are unsure which is best for your use case.
Running The Script
There are two main ways to run the script, assuming it is stored in C:\Temp
PowerShell ISE
- Open Powershell ISE
- Select File > Open and select the script
- Execute the script using the ‘Run’ or play looking icon

PowerShell CLI
- Open PowerShell terminal
- Change to the C:\Temp directory
- Type .\<script_name>.ps1

If the script ran successfully, you should have:
- “TESTVPNPROFILE” visible in FortiClient VPN
- “TESVPNPROFILE-SAML” visible in FortiClient VPN
Notice that the settings in each profile should be different. Once you have confirmed the profiles are created successfully, delete them, as we will now push the script to the device via Intune.
Note: make sure that your script works before continuing. If it fails, it is never going to work via Intune.
Importing the Script to Intune
- Open https://endpoint.microsoft.com
- Select Devices > Scripts (Policy Menu) > Add
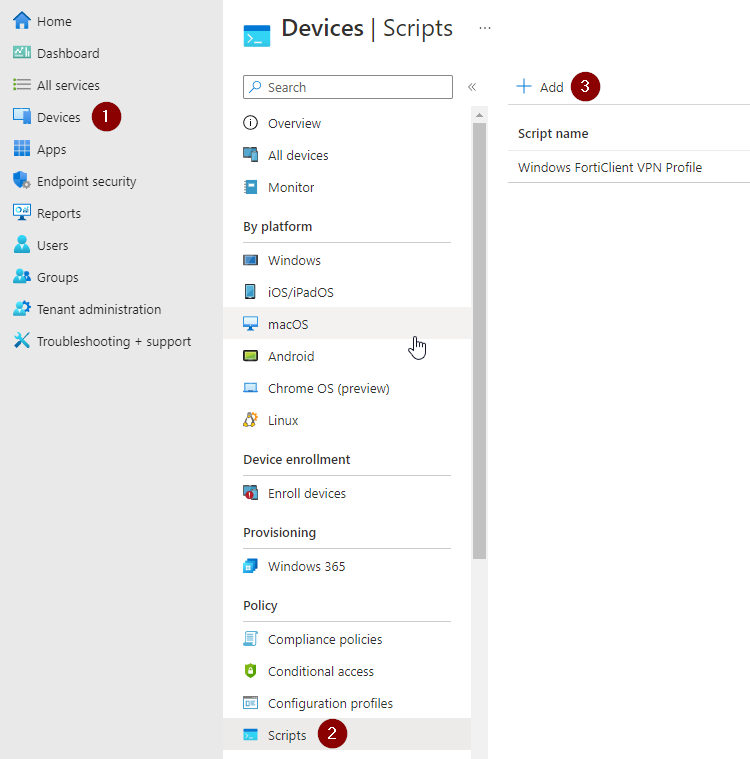
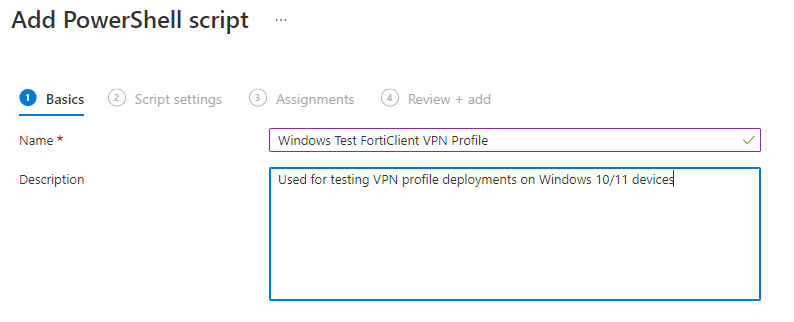
Give the script a meaningful name and description, then click Next to continue:
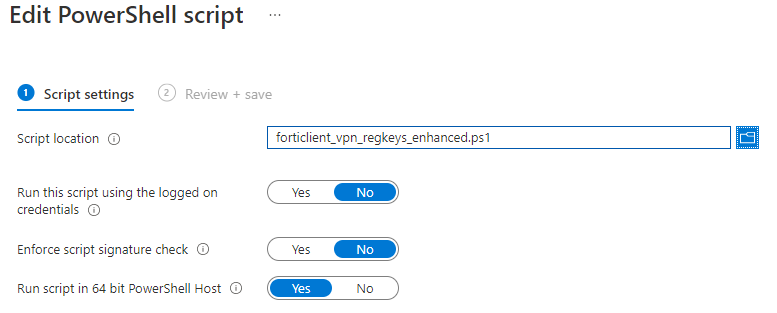
This section is the most important part:
- Select the script that you created earlier by clicking the folder icon and selecting the script
- Toggle the other settings as required – see explanations below
Run This Script Using the Logged on Credentials: Typically, this is only required when you want settings to apply to the logged-on user. For this script it needs to apply to all logged in users and modify the registry – remembering that regular users do not have permissions to modify the registry. Therefore, keep the default of ‘No’ which will run the script as the ‘System Account’.
Enforce Script Signature Check: if set to ‘Yes’, Intune will follow PowerShell ‘ExecutionPolicy’ settings. As a result, any unsigned script would be blocked. If your script is unsigned, select ‘No’.
Keep in mind that even if your script is signed, there are other requirements to meet in order to run signed scripts, for example having certificate chains published to device certificate store, code signing certificate in the Trusted Publisher store etc.
Run Script in 64 Bit PowerShell host: for Windows 10 and 11, I expect this should always be set to ‘Yes’, especially when editing the registry.
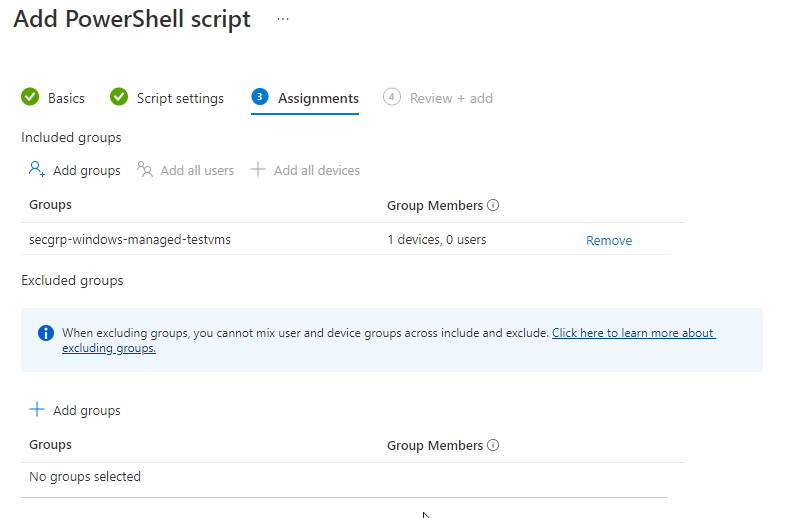
On the Assignments window, this is where you select the group that this will apply to. In our case we have applied to a security group that contains one test device. Once the required group is applied, save all changes to create the profile creation.
Testing
At this point you should have all the required configuration items in place for the script to work.
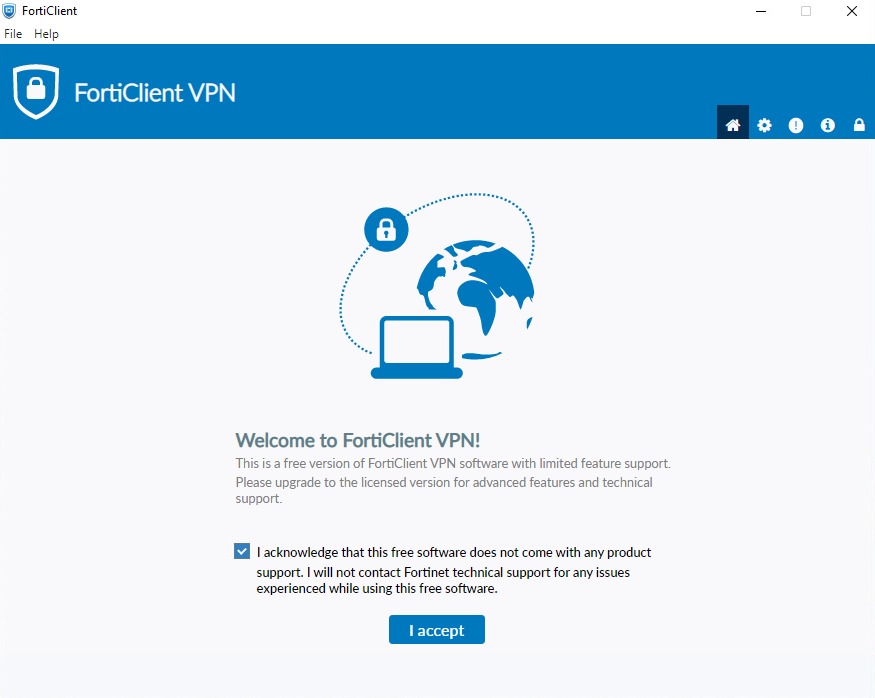
While there are methods to sync the changes to the device, when it comes to scripts it is far easier to reboot the device as scripts are always checked on device boot. It may take a few minutes after the reboot for the profiles to appear. Also, as I mentioned in Part 1 of this series, you need to accept the ‘Welcome to FortiClient VPN!’ first use warning for the profiles to be visible. As a refresher, you can see this below:
That is it! If you have done everything correctly, you should now have the same two VPN profiles configured as when you ran the script manually.
Troubleshooting
The best place to start troubleshooting is by reviewing the logs at “C:\ProgramData\Microsoft\IntuneManagementExtension\Logs\IntuneManagementExtension.log”. In this log you will see a lot of activity for applications evaluated for installation, but you should also see information about scripts that will run, including the contents of your Powershell script which is handy.
Closing Statement
This ends Part 2 in the series. Please keep an eye out for Part 3 post in this series in coming weeks where I will show you how to update the FortiClient VPN software as new releases come out.
- Part 1: Install FortiClient VPN with Intune
- Part 3: How to upgrade FortiClient VPN (coming soon)